FamilyEducation
FamilyEducation
Family Education

FE-Menu

  • Pregnancy
    • <blank>
      • Pregnancy Tracker
      • Trying to Conceive
      • Signs & Symptoms
      • Pregnancy Health
    • <blank>
      • Baby Names
      • High Risk Pregnancies
      • Preparing for Baby
    • <blank>
      • Concerns & Complications
      • Labor & Delivery
      • Postpartum
  • Baby Names
    • <blank>
      • Browse All Baby Names (A-Z)
      • Top Names for Boys
      • Top Names for Girls
      • Baby Name Generator
    • <blank>
      • Baby Name Lists & Ideas
      • First Names By Origin
      • Browse All Last Names (A-Z)
      • Last Names by Origin
  • Babies
    • <blank>
      • Caring For Your Baby
      • Baby's Health
      • Feeding Your Baby
    • <blank>
      • Your Baby and Sleep
      • Baby's Growth & Development
      • Baby Hygiene
    • <blank>
      • Baby Safety
      • Baby Products
    • <blank>
  • Toddlers
    • <blank>
      • Toddler Growth and Development
    • <blank>
      • Toddler Behavior and Discipline
    • <blank>
      • Your Toddler and Sleep
  • Kids
    • <blank>
      • Health
      • Childhood Development
      • Fitness & Nutrition
      • Childhood Safety
    • <blank>
      • Communicating with Your Kids
      • Childhood Behavior and Discipline
      • Fostering Responsibility
      • Instilling Values & Manners
    • <blank>
      • Childcare
      • Neurodiversity in Kids
      • Adopting Children
  • Teens
    • <blank>
      • Teen Health
      • Teen Puberty & Sex
    • <blank>
      • Behavior & Discipline
      • Teen Social Development
    • <blank>
      • Values & Responsibilities
  • Activities
    • <blank>
      • Printables
      • Indoor Activities
      • Learning Activities
      • Arts and Crafts
      • Performing Arts
      • Food Activities
      • Outdoor Activities
    • <blank>
      • Books
      • TV
      • Movies
      • Online
      • Quizzes
      • Games
      • Celebrities
    • <blank>
      • Parties
      • Travel
      • Toys
      • Holidays
      • Gifts
  • Learning
    • <blank>
      • By Grade
      • By Subject
      • College
      • Preschool
    • <blank>
      • Back to School
      • Study Skills
      • Learning Styles
    • <blank>
      • Homeschooling
      • Parental Involvement
      • Your Child's School
  • Family Life
    • <blank>
      • Mom Life
      • Dad Life
      • Family Relationships
      • Having a Healthy Marriage
      • Divorce
    • <blank>
      • Health & Fitness
      • COVID Resources
      • Managing Your Home
      • Moving Your Family
      • Pets
    • <blank>
      • Family Finances
      • Work
      • Families and Food
  • NewslettersNewsletters
    Newsletters

Breadcrumb

  1. Home
  2. Kids
  3. Childhood Safety
  4. First Aid
  5. How To Make A Sling Or Splint


How to Make a Sling or Splint

Read these tips on how to make a sling or a splint out of everyday items.
  • facebook share icon
  • pin
  • twitter share icon
  • email share icon
  • Print page icon

How to Make a Sling or Splint

Before You Put the Band-Aid On

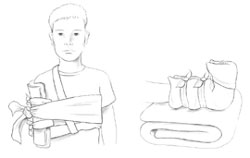
Letting the fingers peek out of a sling is not just to allow the injured person to wave hello. By having a clear view of the fingers, one can easily tell if circulation is being maintained. If the fingers turn pale or too red, adjust the sling or the bandage.

The “slings of outrageous fortune” might have created the emergency situation you find yourself in, but only a real, down-to-earth, and oh-so-practical sling will help you help someone with broken or bruised limbs. Here's an easy way to make an arm sling:

  1. Fold a scarf or cloth into a triangle.
  2. Put one end of the triangle at the shoulder of the uninjured arm. Let the triangle dangle down the chest.
  3. Place the injured arm or bent elbow over the triangle dangling down the chest.
  4. Pull the dangling portion of the triangle up to meet the end at the shoulder. The injured arm should be inside the triangle, elbow covered and fingers peeking out.
  5. Tie the two ends together at the side of the neck—not at the back (you can damage the spine).
  6. An ordinary safety pin will keep the sling in place. Using the safety pin, attach the point of the triangle at the elbow to the sling. (If you don't have a safety pin, twirl the point until the arm is snug, then make a knot.)
  7. Make sure the hand is four to five inches higher than the elbow to keep the blood flow circulating and to decrease pain. Adjust the sling, if necessary.

See “How to Prevent Muscle Cramps and Strains” for more detailed information on slings, immobilization techniques, and combination bandages/slings to use on different body parts.

Ouch!

Don't tie the splint too tight. It can cut off circulation. While waiting for help, continue to check the splint. Make sure that post-accident swelling hasn't made the splint too tight. Also, periodically take a pulse. If it becomes faint, loosen the splint.

Like bandages, splints provide support to broken bones, fractures, sprains, and painful joints. When it comes to bones or joints, the most important first aid you can give is stabilization. This keeps those bruised and broken bones immobile so there is no further damage. Splints help the immobilization process. If you don't have actual boards in your first aid kit, use your imagination. Almost any hard, straight object will do. A rolled up newspaper or magazine, a baseball bat, a pillow, a folded blanket, an umbrella, or even a broom may be used to provide stabilization.

Use stiff items to create splints that immobilize joints.
Use stiff items to create splints that
immobilize joints.

Regardless of what you use as a splint, it must be securely attached to keep the body part immobile. And, for secure attachments, don't go any further than the closet. Belts, ties, sleeves ripped from shirts, twisted-up T-shirts, stockings, and even underwear can be used as slings. They can easily reach around the arm or leg and be knotted, tied, or buckled securely. The table below contains suggestions for using basic everyday items to create splints for various body parts.

Making Homemade Splints
Body Part Splint Suggestion
Upper leg Splint the two legs together.
Lower leg injury Use a rolled up newspaper, a baseball bat, or a broom handle.
Ankles and feet Rolled up newspaper or a magazine is best.
Back, Upper Torso, Head and Neck Only hard earth will do. Immobilize the person by placing folded blankets and pillows up against him or her and securing them with belts, ties, or sleeves. Remember not to move a person if a back or head injury is suspected.
Arms An umbrella, a stout stick, a cane, a baseball bat …any of these will work.
Hands A small board, a notebook, a picture in a frame, magazines, or newspapers will give a hand support.
Fingers Splint the problem finger with the adjacent finger.

What's hot

  • Attention Seeking Behaviors KidsHow to Handle an Attention-…
  • an age-by-age guide to teaching kids about "the birds & the bees" KidsAn Age-by-Age Guide to…
  • How to stop bullying KidsHow to Stop Bullying: Real…
  • Treating Burns KidsFirst Aid For Burns: How to…
NewslettersNewsletters
Your partner in parenting from baby name inspiration to college planning.
Family Education
FamilyEducation does not provide medical advice, diagnosis or treatment. Your use of the site indicates your agreement to be bound by our Terms of Use and Privacy Policy. Information on our advertising guidelines can be found here.

FE Footer

  • Newsletter Center
  • About Us
  • Privacy Policy
  • Editorial Policy
  • Editorial Team
  • Expert Panel
  • Cookie Policy
  • Site Map
  • Contact Us
  • Advertise
  • Terms of Use
  • Do Not Sell My Info (for CA Residents)
sandbox learning logo
Family Education is part of the Sandbox Learning family of educational reference sites for parents, teachers, and students. 

factmonster logoinfoplease logoTeacherVision logo

sandbbox logo
©2022 Sandbox Networks Inc. All rights reserved. Sandbox Learning is part of Sandbox & Co., a digital learning company.