Stylish Christmas Stockings
Stylish Christmas Stockings
“The stockings were hung by the chimney with care in hopes that St. Nicholas soon would be there …” Impress St. Nick with these elegant personalized stockings that will withstand the wear and tear of Christmas morning. You can make one for each member of your family or use one as a unique wrapping for a special gift.
Level: Moderately difficult
Time involved: One to two hours
Materials:
- Two pieces of 24 x 20 inch Christmas quilted material
- Ruler
- Scissors
- 24 inches of 5-inch-wide lace
- Straight pins
- Sewing machine
- Thread
- Iron and ironing board
- 30 inches of matching trim
- Glue gun
- Green fabric paint in a squeeze bottle
- Gold bell (optional)
- Needle and thread
Festive Facts
Do you know where the tradition for hanging stockings on the mantle originated? Some say that St. Nicholas started the custom when he tried to help the daughters of an impoverished man attract husbands by providing them with dowries. According to the legend, St. Nicholas dropped bags of gold in the windows of the girls' rooms. One night one of the bags landed in a stocking that had been hung up to dry. Thus, the tradition of putting gifts in stockings was born.
Holiday Hassles
Here are some basic tips and techniques that can help take the hassle out of sewing fabric. First of all, be sure you have a flat working area to lay out your material. You should have special sharp scissors that you only use to cut fabric. Press your material before using it, and pin the area to be sewn together with straight pins to keep it from slipping apart when sewing it. Always leave at least a 1/2-inch margin around the edge of the seam and cut slits in this margin around the curves to keep the stitches from puckering. (Be careful not to cut the thread when doing this.)
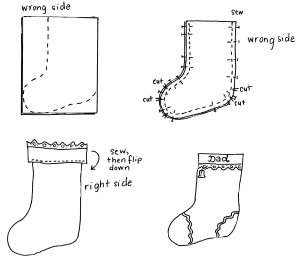
Place the two pieces of quilted material right sides together on a flat surface with the 20-inch length horizontal. Starting at the upper-left corner of the material, use a ruler to mark off 12 inches. At this mark, cut a straight, vertical line 15 inches long. Then make a horizontal cut to the right that is 8 inches long to form the foot area of the stocking. Make a second vertical cut 9 inches long to complete the foot area. Round off the corners of the foot area and heel area as shown (see illustration).
Cut two pieces of the lace 12 inches in length. Pin a piece of lace to the top of each stocking with the “right side” of the lace against the “wrong” side of the stocking material. Sew the lace along the tops of the stockings using a 1/2-inch seam. Flip the lace over to the right side of the stocking and press it down with an iron. You should have two stocking forms with the lace trim on the “right side” of the material.
Pin the two stocking forms with the right sides together. Sew around the sides and bottom of the stockings using a 1/2-inch seam. Cut slits into the bias of the seam around the corners to prevent the material from puckering. Turn the stocking right-side-out and iron it flat.
-
Glue a piece of trim across the top of the stocking. Glue another piece of trim along the heel and toe area of the stocking. Form a loop and stitch a piece of the trim onto the upper-left corner for hanging purposes.
Write a name on the lace trim with the squeezable fabric paint. If desired, sew a gold bell onto the side of the stocking.