Bandaging Wounds
In this article, you will find:
Head and knees
Bandaging Wounds
Bandages have three purposes: to keep wounds clear of infection, to contain bleeding, and to provide additional protection and support. Sterile gauze is preferable, but in an emergency just about anything will make a good bandage: scarves, T-shirts, socks, sheets, stockings, even a belt.
Bandaging a deep wound requires more than simply sticking a Band-Aid over the cut and hoping for the best. Deep wounds require bandages that are administered after a wound is cleaned and treated at the hospital.
Before You Put the Band-Aid On
Never wrap a bandage too tightly. You want to keep bleeding in check and protect the wound, but you don't want to stop circulation or cause irritating chafing! If the wound is on an arm or leg, check circulation by making sure fingers or toes stay warm and pink. If they become cold or blue, it's a sign there's a circulation problem. Periodically check the patient's pulse just to make sure everything's okay.
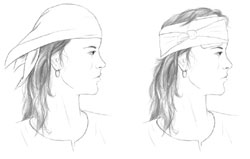
Bandaging Head Wounds
If a wound affects the scalp, the bandage should be made by tying a kerchief on the head and knotting it in the back.
- After putting on your protective gloves, stopping any bleeding, and cleaning the wound, fold a large bandanna-sized cloth into a triangle.
- Place the bandage on the injured person's head, with the tip at the back.
- Bring the two ends across the head, just above the ears and cross them in back.
- Bring the two ends back to the center of the forehead. Tie ends together.
- Tuck hem of bandage snugly under wrap.
forehead wounds.
If a wound only affects the forehead, put a square of sterile gauze pad over the wound. Then wrap a sterile gauze bandage around the head, “sweatband” style. Circle the head at least three times to keep the dressing underneath in place. Cut and use adhesive tape to attach the ends, or tie them with a firm knot. You can also use a large piece of cloth, wrapping it several times around the head. Tie the ends in place above the eyes in the middle of the forehead.
"toothache" style. Then cross the ends on one
side of the head and tie on the other side.
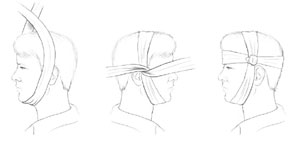
Ears and cheeks require a bandage that is more like an “old-fashioned toothache” style. These steps teach you how to apply such a bandage.
Ouch!
Do not use this bandage style if the injured person has a jaw problem or if he or she is vomiting. It can cause suffocation!
- Place the long, thick bandage under the chin.
- Pull the ends up over the ears and cheeks, covering the treated wound.
- Cross the ends on one side, just above the ear.
- Wrap the two ends in the opposite direction, making a “cross” by encircling the forehead and back of the head.
- Tie ends where the “cross” meets.
Wrapping Knee and Leg Wounds

To make a bandage that won't come apart on the knee or leg, follow these steps:
- Clean and dress the wound while wearing protective gloves.
- Bend the knee unless it causes pain. Then place the middle of your wide, long cloth at the underside of the knee joint (and over any dressing).
- Wrap the cloth, with opposite ends crossing, over the knee and the upper or lower leg (depending on the location of the wound).
- Tie ends into a knot.
- Secure the bandage with adhesive tape or safety pins.
Follow these steps to apply a bandage to the leg using a spiral technique:
- After you clean the wound and apply an antiseptic, place one end of a long, wide cloth on the outer side of the leg. Secure it with adhesive tape.
- Twirl the bandage around the leg until you've covered the wound and dressing and the entire wound is protected.
- Secure the loose end with tape or safety pin to keep in place.