In this article, you will find:
Back, neck, fingers, and toes
Bandaging the Back and Neck
When someone suffers an injury to the back or neck, it's more important to keep him or her immobile than anything else. But sometimes that's not possible. Maybe the victim is face down in water and cannot breathe. Maybe he is vomiting and needs to have his head tilted. Maybe this person is bleeding profusely.
As is true of grammar, there are always exceptions to the rules. In those situations when bandaging a back or neck wound is necessary, follow these steps:
- Move the injured person as little as possible.
- If cleaning and treating a wound is sufficient to stop the bleeding, simply put a loose cloth over the treatment. It will provide protection without adding possible trauma.
- If an injured person feels a tingling in her limbs or cannot move, it's possible that she might have broken bones. In this case, immobilize the head, neck, and back area.
- If the injured person is having difficulty breathing, very gently lift his or her head slightly and place a pillow underneath. This will help clear air passageways.
- Keep bandages simple. Use a “spiral” technique or cover the area and tape it down with some adhesive—just tight enough to stop bleeding.
- Keep checking the injured person's pulse. If it starts feeling weak, loosen the bandages!
Wrapping Fingers and Toes
the gauze up and down, and then wrap
the gauze around the digit. Finally, knot
the bandage to complete the process.
Before You Put the Band-Aid On
A splint immobilizes an injury to prevent further damage and to help promote healing. If a plastic or wooden brace is not readily available, the next best splint for a finger is the adjacent finger! Just be sure to place sufficient padding between the fingers before gently wrapping the fingers together.
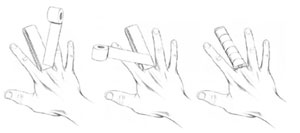
Bandaging wounded fingers or toes is just like bandaging any other part of the body but with smaller actions and smaller pieces of cloth. It also requires a bit more dexterity and it would be a good idea if you practice on a (willing) friend or family member before an emergency arises. After you clean the wound, follow these steps to wrap a finger or toe:
- Using a long roll of narrow gauze or a strip of cloth, place one end at the base of the finger or toe.
- Hold the strip down with your thumb as you roll up one side of the finger or toe and down the other side.
- Hold the other side down with your third finger (or whatever fingers you feel comfortable using) as you roll the tape up and over with the other hand.
- After wrapping several layers of tape up and down the finger or toe, move the gauze roll to the side and begin to circle the finger or toe.
- Knot the gauze at the base of the finger or toe as shown here.

A finger or toe bandage can also act as a splint in a pinch. Once you've bandaged the finger or toe (up and down and side to side), pull the gauze roll down to your wrist or up to your ankle. Wrap around the wrist or ankle, and then pull back up and around the finger (or down and around the toe). Repeat several times and tie at the wrist or ankle. The following drawing illustrates how to wrap the hand in this way.